How To Polish Glass
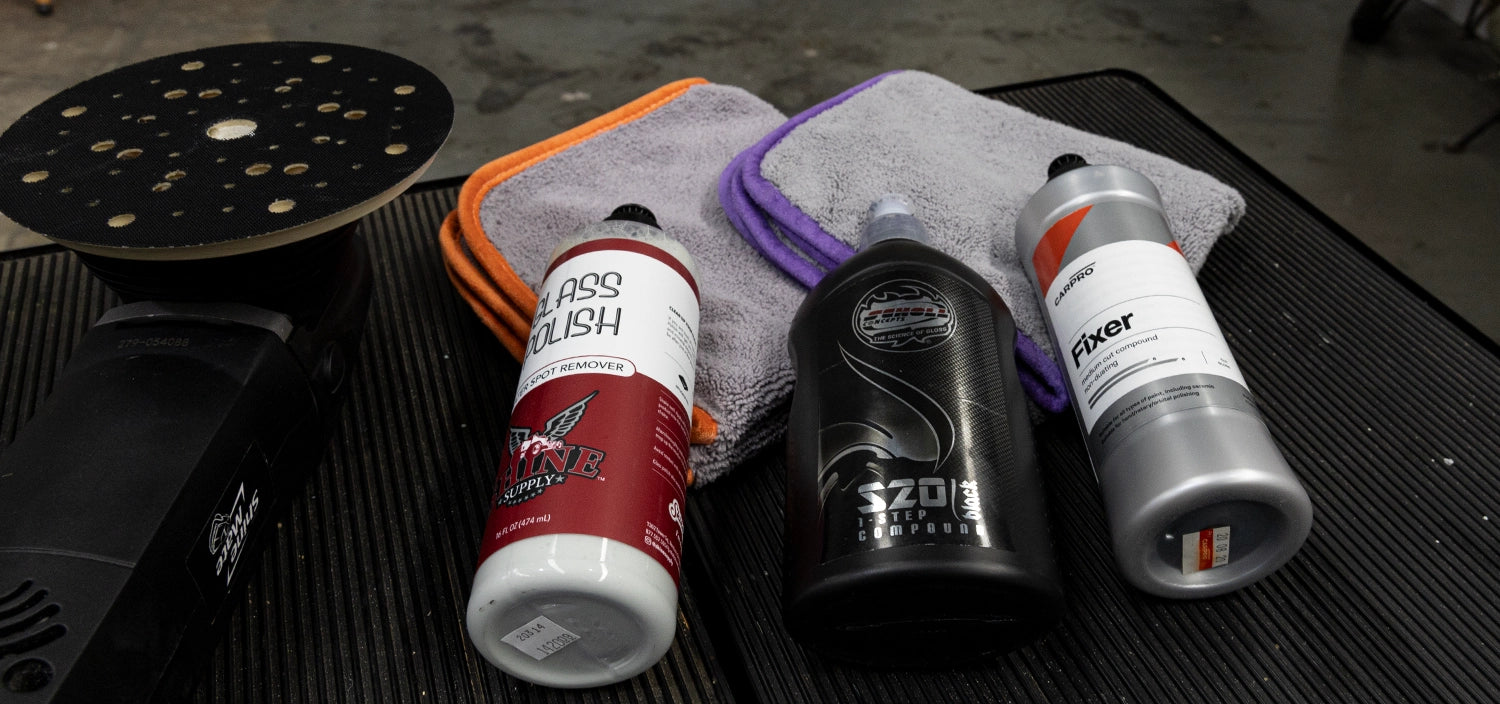
Polishing Your Glass Your Glass is just another surface on your vehicle that can be polished just like your vehicle's paintwork. Polishing your glass can be a fantastic way to give it a super clean as well...

A cut and polish is a common term to refer to paint correction. In essence, the "Cut" is about removing scratches & marks from the paintwork, whilst "Polish" is about restoring gloss.
Paint Correction is a process of levelling down & polishing automotive paint for the purposes of removing existing defects such as swirls, scratches, oxidation and water spots/etchings - as well as improving the paints gloss, saturation and clarity levels.
After periods of environmental exposure, wear and tear from daily use, maintenance and washing - a vehicle will begin to look weathered and collect minor damages such as swirls and scratches in the paintwork. A cut and polish is a fantastic way to permanently remove that wear and damage and restore the vehicle’s appearance to a like new condition.
Beyond that, allowing stained, oxidised and environmentally contaminated paint to continue being on your vehicle will accelerate its deterioration even further and make the maintenance and wash of the vehicle more difficult and time consuming.
If a wax, sealant or coating is applied to damaged and weathered paint it simply won’t perform very well or last very long. So a cut and polish can also be a vital step before applying any paint protection to a vehicle.
When polishing paint you are always removing at least a small portion of the existing paint or clear coat, so a cut and polish should always be performed only when needed and with care as not to be overly aggressive.
To achieve a high quality and consistent result a cut a polish can be quite a time and labour intensive process to perform. Hiring an experienced professional can also be can expensive service. For someone without the necessary products and equipment such as compounds, polishes, pads and machines it can be a costly initial purchase to buy the necessary equipment in order to perform a cut and polish. Without some proper guidance or experience in the area of paint correction, it can be quite difficult to perform a cut and polish for a beginner.
You can use hand pads as an alternative, although to cut and polish your cars it’s a time and labour intensive venture compared to using a machine polisher which will always yield better results.

(ShineMate EX605 12mm Dual Action Polisher)
After ensuring that your vehicle is completely clean, decontaminated and dry, your first step should be to mask sensitive rubber and plastic trims with masking tape to protect them from compounding residue or damage.
As all automotive paint and existing defects are different, it’s vital to always perform a test section on your particular paint with your choice of compound, pad, and machine for the first cutting stage.
It’s really best to always start with the least aggressive pad and compound (so you remove less clear coat) as you can always move to a more aggressive combination if needed. Depending on your results, you can move to a more aggressive compound/pad combination to dial in the perfect system for your paintwork. A great kit to use would be the Shinemate 12mm DA Polisher Kit, which comes with an array of compounds & pads to suit all paint systems.
In most cases it can be near impossible or at least far too dangerous to remove 100% of paint defects as you’ll just be removing far too much paint. So a more realistic and safe goal should be to just remove the majority of them to greatly improve the paint. A safe place to be is 80-90% of defects.
A basic method and technique to using a machine polisher is to apply a few small drops of compound to your pad, spread it into a half square meter section and then using overlapping horizontal and vertical movements to run the polishing pad over the section area. Use moderate pressure, a slow arm movement and a mid machine speed, performing 3 to 4 row passes of your pad in total within that half meter section.
Technique can influence your results, so in general using a more aggressive technique with increased pressure, machine speed and slower arms movement will tend to increase cutting ability but will also tend to diminish the finishing qualities, but as a general rule it’s neither advised to be overly aggressive or overly gentle as it can lead to other issues and decreased results. As such it’s best to use just a slightly more aggressive technique for the first cutting stage, and just a slightly less aggressive technique for the final polishing stage.
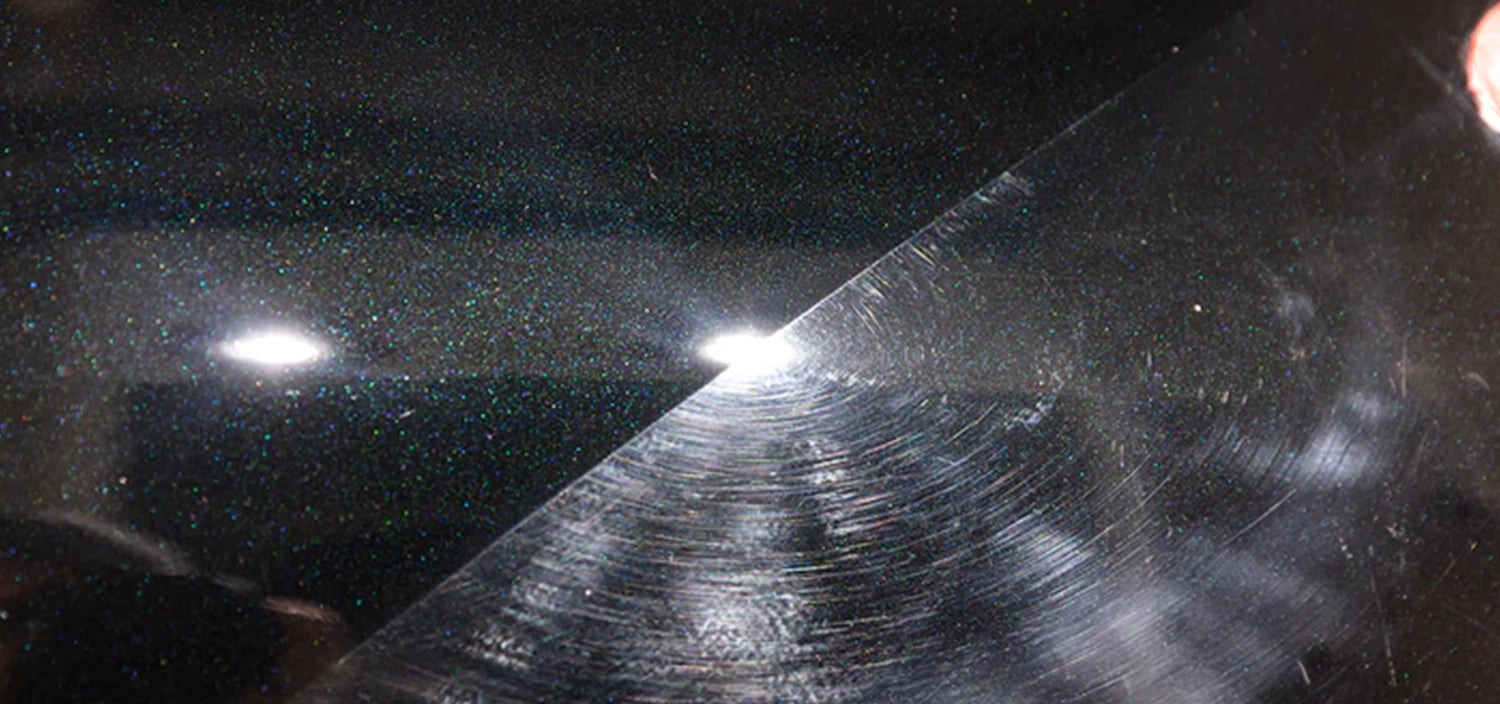
Once you’ve completed polishing your section, use a microfiber cloth to wipe off the compound residue and then use an alcohol based panel wipe solution such as Nv Clarity to further wipe off any polishing oils. It’s important to assess your results with a quality defect spotting light source like the TakeNow Handheld Detailing light. You should be comparing the test section to the untouched paint to see how many of the scratches and defects you have removed and then you can decide if you're happy with the results or if you feel you need a more aggressive combination to remove more of the defects.

It’s also import to note that it’s completely normal for you to see increase levels of haze and marring in your compounding or cutting stage, which you can address in the next polishing stage, so your focus should really be on just removing the existing defects rather than the gloss or clarity of the finish fit this first stage.
You may need to perform several test sections before you find the right combination of compound pad and technique for your particular paint, but once you feel you have a good combination you can then move onto testing your next and final polishing stage.
After you are happy with a "cutting" combination, it is a good idea to then perform another test section, this time "finishing" the cut area with a finer pad & compound.
In this second polishing stage you’re no longer removing the defects that you already addressed in the first stage, but rather just removing any compounding haze or marks and amplifying the paints gloss level. So what you should be looking for here is a darker more saturated finish with more reflective qualities and clarity.
Once again it may take several attempts, adapting your choice of polishing pad and technique to achieve a good result on your particular paint, but once you find that right combination you know have both your cutting stage combination and your polishing stage combination all set-up. Then you can go ahead and perform your cut and polish over the entire vehicle section by section.
For a visual and thorough demonstration of what a good technique and process looks like, check out our Waxit Enthusiast Polishing Kit.
It’s extremely important to be as consistent as you can during the entire cut and polish process of your vehicle, so try and work the same size areas throughout with the same technique you used in your test sections.
You can complete all of the cutting stage on the vehicle before you start the polishing stage or you can also cut and polish panel by panel if you wish.
Your Pads can become overloaded with residue from polishing quite quickly, so it’s important to frequently brush and/or wash your pads frequently. You should also use multiple pads allowing them to cool down as you swap your pads throughout the whole paint correction process. Panel edges and creases are the most sensitive and risky areas of a vehicle to polish, as such they don't need as much time or aggression to correct them, so be sure to be less aggressive in those areas as to avoid any damage.
Avoid working intensively in direct sunlight or on hot panels as it will lead to diminished results and a far more difficult user experience with increased dusting and harder wipe-offs. As cut and polishing your paint leaves no protection behind, be sure to add your choice of a wax, sealant or coating to protect the paint once you’re done.
If a vehicle is regularly washed with safe car washing methods and well maintained with some paint protection in place, the results you achieve during your cut and polish should last for years to come, but it’s more than likely if you keep the vehicle for an hour or an extended period that it will need another cut and polish sometime in the future.